Support

3 Support Entries

Possible cause/checklist:

  1. Position Linmot pusher plate:
    Must be 1 mm behind tin plate edge!
  2. Adjust roller clearance on all 7 pairs according manual.
  3. First roller pair:
    If you can’t get 0.1 mm roll clearance, check the toothed gears inside/outside. They may have a wrong lateral position; that ends in a too big clearance between the shafts!
  4. Test after setting:
    Take off main and inner timing belt, rollers touching each other, all gears must have slight play!
  5. Check and adjust a well rollformed canbody:
    Form of canbody must be round, both edges must have a parallel overlap, depending on the diameter!
    – Diameter 52 mm = approx. 5 mm
    – Diameter 99 mm = approx. 20 mm
  6. Check the feeder angle and rollformer speed according the recipe of the canbody you are currently running.
    NOTE: «If parameter is different from recipe, it has been changed without authorization of Can Man! Any guarantee claims will be refused!»
  7. Check the curve you have in the tuning window with the recipe of the canbody you are currently running.
    NOTE: «If parameter is different from recipe, it has been changed without authorization of Can Man! Any guarantee claims will be refused!»
  8. Make sure you have mounted the correct pair of final pusher fingers (see the diameter range engraved on the fingers).
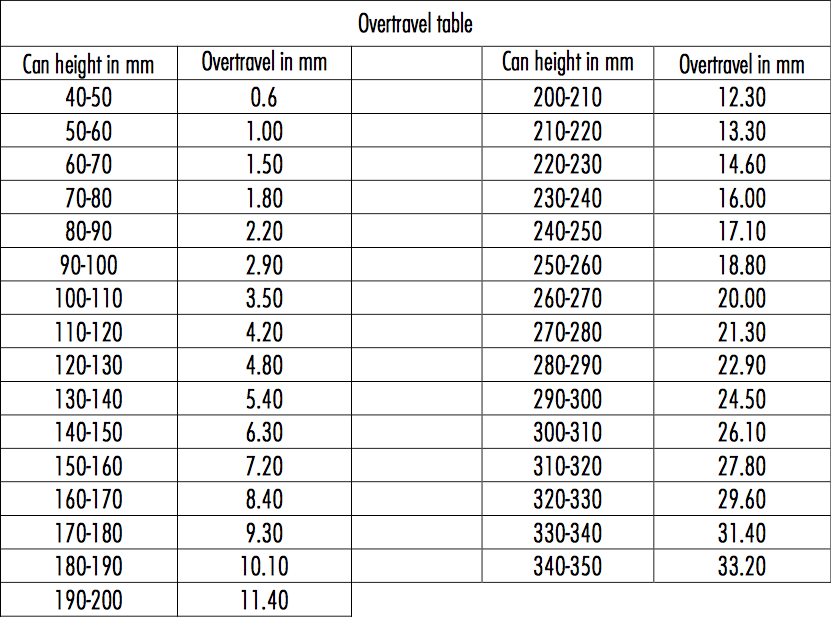
  9. Check the actual overtravel with the help of the manual.

The recipe helps to adapt the speed of the incoming can into welding roller and the actual welding speed. In the best case, those speeds are equal.

Below you find a table of this recipe in steps of 10 mm can height.

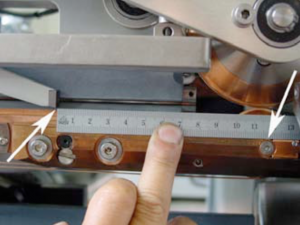
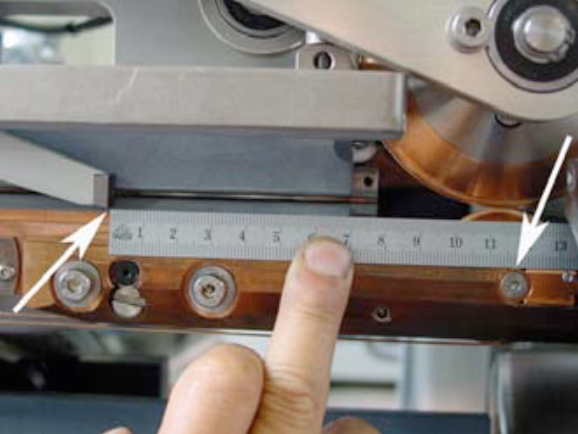
Turn the wheel of the synchrostar, that the pusher finger is as close as possible to the welding roll.

Measure now the distance from the top of the pusher finger to the center of the welding roll.

Distance = Can height – Overtravel Example:
Canheight: 122mm Overtravel: 4.8 mm

Distance: 117.2 mm

Possible cause:

  • Check the wire groove, maybe the profil is not straight anymore (see also if short near the seam).
  • Too much welding current.
  • Too low welding frequency.
  • Check the tension the belt for the profiling unit and pendulum rollerhead.
  • Servo drive transport belt: Check if the whole transport belt  unit is vibrating during positioning. If yes: Change the drive gear on top the servo motor.

Possible cause:

  • Check the air pressure on the small air regulator, the value must be around 0.5bar (pressure to engage the clutch).
    • refer also to the touch screen “Air” symbol, where you find the exact values.
  • Check the air pressure on the precision air regulator, left side from synchrostar motor, to 1.6 to 2.0 bar (pressure to disengage the clutch)
    • refer again to the touch screen “Air” symbol.
  • Check whether the safety clutch is engaged or not: Turn the synchrostar by hand, and see whether the motor is also turning or not. If yes, the clutch is engaged!
  • If the clutch is engaged, but the error message still remains, the sensor B69 might wrong positioned:
    • Check if the LED from the sensor is OFF.
    • If the LED is still ON, turn the sensor a quarter turn counterclockwise, or until the LED is OFF. Do not turn the sensor too much counterclockwise. If the distance is too big the clutch does not stop the machine in case of a crash. To test you can adjust the precision air regulator of clutch to „0“. Now the clutch is disengaged and the sensor has to be ON.
    • Make sure that the sensor has still a clearance of about 0.5mm refer to manual Mayr EAS 450  or Mayr Clutch 0-481-325
    • Turn the synchrostar and make sure that there is no resistance coming from the sensor/clutch!
All Can Man content is now also available on the Soudronic Group website.
Where do you want to continue your journey?
All Can Man content is now also available on the Soudronic Group website.
Where do you want to continue your journey?