Support

5 Support Entries

NOTE: There are two type of wire tension systems for the CM16:

  • CM16 – 300/400 has two pressure gauges.
  • CM16 – 200 works with one pressure gauge and a spring tension system.

Possible cause:

  1. Try to move the tension cylinder / cylinders by hand back and forward, without air pressure and wire.
  2. Try to turn lower welding roll (without wire) by hand.
  3. Check the groove of the upper welding disc.
  4. Is the wire width correct?
  5. Adjust the pressure of the tension cylinder(s), read for more info here! Cylinder below wire profiling unit requires 1.6 bar. Cylinder (behind main alu-plate) for wire chopper unit requires 2.0 – 2.4 bar.
  1. Try to move the tension cylinder / cylinders by hand back and forward, without air pressure and wire.
  2. Try to turn lower welding roll (without wire) by hand.
  3. Check the groove of the upper welding disc.
  4. Is the wire width correct?
  5. Adjust the pressure of the tension cylinders: Cylinder below wire profiling unit requires 1.6 bar. Cylinder (behind main alu-plate) for wire chopper unit requires 2.0 – 2.4 bar.

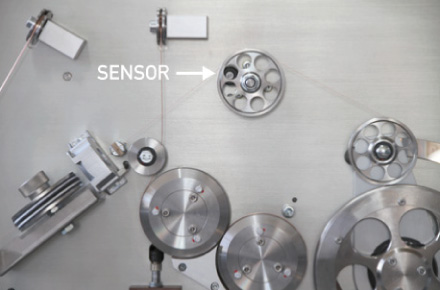
The error occures when there is a problem with the measurement of the wire speed (not wire speed by self).

  • Check the gap between idler wheel and sensor, 1mm is recommended!
  • Check the bearings of the idler wheel! Is turning smoothly? To much play can create an unstable gap to the sensor.
  • Check cable between sensor and plc!

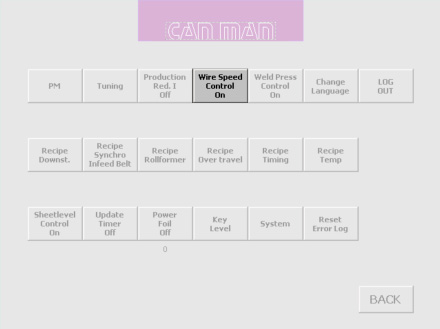
If there is still a problem with the measurement of wire speed, you can proceed as follows to restart production:

  1. Push the “Key button” on home screen
  2. Login with your password ****
  3. Push again the “Key button” to reach the setting window
  4. There you can find a second “Key button”. Push that button to reach the main setting window.
  5. There you can find on right top position a button “Wire speed control”
  6. Switch this funktion to ”OFF”

Please note: The workaround described above is not recommended for permanent production!

Possible causes/checklist:

  1. Take the wire and switch out of the air supply. Can you smoothly move both cylinders of the wire drive?
  2. Check all rolls of wire drive system. Turn them by hand. All bearings ok?
  3. Check the transport wheel of wire chopper unit, condition and distance (acc. to instruction manual)
  4. Remove the belt of the motor for pendulum roller head and turn them by hand. Is it turning smoothly?
  5. Check the same on profiling and chopper unit.
  6. Now install the belts and tight them correctly.
  7. Put in the wire and adjust the air regulator.
    Cylinder wire profiling unit 1.5 bar and cylinder wire chopper unit 2.0 bar.
  8. Change the selector switch to “wire manual” and run the wire.
  9. Take a look at welding rolls – is wire position correct?
  10. Check profiling of copper wire, correct width and constant?
  11. Weld a can with current and without current. Wire break?
  12. Have you changed the wire? Use the old one to compare.
  13. Check the tin mark on the wire. Ok?
  14. Don’t forget to lubricate the profiling unit and chopper unit.

Possible causes:

  • The movement (the back and forth) of the wire and the final wire break happens, because the analog signal is right on the threshold to start. You can solve the problem, when you increase the „Hertz“ setting of the frequency converters U4 and U6.
    • Place the programming display on the converter U4 and change the parameter C19 from 5Hz to 7Hz, and do the same for the converter U6.
  • A second reason for this phenomena could be the incorrect position of the analog sensors B1 and B2, see the following description, which is explained for the CM X8, but is valid also for the other automatic welders.
All Can Man content is now also available on the Soudronic Group website.
Where do you want to continue your journey?
All Can Man content is now also available on the Soudronic Group website.
Where do you want to continue your journey?